One of the latest offerings for educators using Office 365 (along with Sway, OneNote Add-ins, New Admin Centre, updated Document Libraries etc), is Microsoft Classroom (previously Microsoft Class Dashboard).
This is the latest tool aimed at making it easier for teachers to assess and collaborate with their students,.

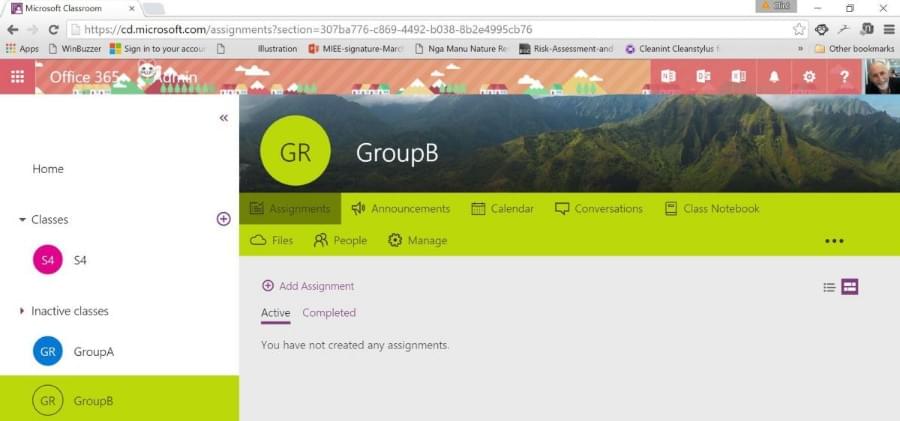
As you can see from the graphic above I have had a small play around with Classroom. What I have seen so far is pretty impressive and it has certainly got me thinking about how I could use it in my teaching.
Let’s take a look at setting up a class and adding an assignment. In this example I will be making up a dummy class.
Creating the Class
The first thing we need to do is to click on the + (add new class) to bring up the screen below.
A new class can be anything from a whole group of people down to a couple of people ( e.g. whole class, reading group, maths group, ESOL group etc).

Note – each class comes with Assignments, OneDrive, OneNote Notebook, Discussions and Calendar (very similar to Groups – (in fact your class is a group and it will show up in your email along with the other groups you have started).
I have named this new class GroupB because I want it to be a group within my class, not the whole class.
It doesn't matter how many classes or groups you set up.

Notice on the left hand side, there there are now two inactive classes and one active. At this stage I will not activate the Group until all is ready to go.
At this stage I am the only person in this class. Adding other teachers and students is an easy task.
Just start entering the students' namse into the dialog box, and if they have an office 365 account their details will pop up

When all students have been added click Done (in this example I am only adding one student).
I can easily come back in at a later date and add more students and/or teachers.

The students’ names will appear under the teacher’s name (in this case only one student name will appear - that of Phillip)
So now we have our class, consisting of one teacher and one student, we need to add an assignment.
Assignments
Assignments are set in Classroom and posted out to classes. Along with the description of the task to be completed, assignments can also include links.
Clicking on Assignments will bring up the following screen, informing us that we don't have any assignments yet.
To add an assignment just click on the + Add Assignmet link

For this assignment I have borrowed a prompt from e-asttle.
Imagine you heard a whisper but couldn’t see who had whispered.
Write to narrate (tell) a story about a whisper
Note that in the Assignment Description links can be included - the link could be to an article to read, a YouTiube video to watch, a link to OneDrive etc
Give the assignment a title, set the date due and the class (GroupB),to post it to.
When ready, click Done

The assignment will then be created showing the following
1. The Date Due : May 2,
2. Title : I heard a whisper but no-one was there
3. Class : GroupB and then assignment instructions
4. How many turned in (completed by student) and how many graded (by teacher)

What the Student gets
Once the assignment has been Posted, it is delivered to the student’s school email. From here, the student is able to add this assignment to their calendar by simply clicking on the + Add to my calendar link.

To access the assignment students will need to load Classroom from the app launcher - providing of course that the associated Classroom license has been assigned to the students ! This was something I didn't initially do, and was at a loss as to why the student was unable to do anything!


The Student’s Assignment
Notice that the student Classroom dashboard is similar to that of the teacher. The assignment is there, with the Date Due, The Title and the Task. It also shows that it has not yet been started by the student. To access the assignment and be able to start it the student needs to click on the assigment

As this is a new assignment the student will need to click on + Create New. Note that if this was already started the student would be able to add to it by clicking on + Add Existing

The student is given the option to complete the assignment in Word, PowerPoint or Excel. By including links within the assignment, the student would also be able to use other applications to complete their assignment. For this example Word is chosen. Word Online will open up and the student is then able to work on the assignment. They are able to change the name of the document (in this case I have left it as Document

Once the student has completed the assignment it needs to be submitted to the teacher for marking, comments etc.
This is completed easily by the student returning to the Classroom screen and clicking on Turn In. Because the document is auto saving to the student's OneDrive (- Files > Class Dashboard > GroupB > I heard a whisper, but no-one was there) it has populated the students Assignment page in Classroom. In this case the assignment ready to be turned in is called Document

The Document has been Turned in and is now showing that in the teacher's Classroom (below)

By clicking on the assignment and then on Submitted, the student's assignment details are available -
First Name, Last Name, Status, Turned In, Grade
By clicking on the Word link, the teacher is able to view, annotate, and grade the assignment. When the teacher has completed this the document can then be Returned to the student and the Grade Posted (if desired)

So there you go, an introduction to using Classroom. In the next installment I will be discussing the rest of Classroom and giving my overall impression.